Hello Blog World.
First off, I can understand if you all are upset that I never wrote out & published an article bout a DIY New Year's Eve projects. While it would of ended the Festivus season nicely, I just didn't have it in me. I even wrote 3/4ths of it, but realized I just wasn't happy with it. Add that to a stressful week and that while I'm planning to have a great party, I don't think I can hold a NYE party that's worth telling the world about.
So I hope you don't mind that I'm taking a moment to sit, think & plan for next year. There is no question that I want to provide an amazing year for Limelight Musings and the fans that read it. I even bought a planner so I can attempt to plan ahead & write great blogs that are worth your time reading. I'm already set to write about post-holiday stuff, pre-garden planning & may even do a monthly entry about a knitting project or cooking recipe.
But at the same time, I want to know want you want to read when you are here. To be honest, while I love writing little snippets every week, I always end up wondering, "does anyone care about this?" I guess I have only my job to blame. For each story in every show, we are pushed to answer "why would anyone care about this?" While some take it a step further by saying the media tell people what to think about, I'm not sure if that applies to my little blog.
Like anyone, I do love talking about myself. I always find little humor or situations in my life to be worth sharing, but I don't want a diary blog. At the same time, I can't push a new a project every week. This last month proved that.
So I guess while I look back on the great seven months we've had so far, I wonder what will push us forward in the years (hopefully) to follow. But a lot of it depends on you out there. Would you like to hear about the life of a news producer in Western Kentucky, or do you want an all project blog? Do you think anything is missing in Limelight Musings? What would you like to see here? While I [try] to write here every week, I feel a bit one-sided & miss what you all have to say about the topic. Let's make this entry a conversation about the great year to come.
To start off on a new, personal note, I wanted to list a few things I did in 2011...
- Started knitting
- Started blogging
- Got a great promotion in the job that got me to Western Kentucky
- Started some amazing friendships
...and a few things I want to do in 2012:
- Grow an herb garden
- Buy a home
- Make home-made lip balm (really excited about that)
- Quit smoking (husband & I plan on 12/21/2012, you know, after the end of the world)
So there you have it, one last blog entry before the end of this year. I plan to ring in the new year with loved ones and hope you do the same. Let's have an amazing 2012 that includes gardening, community & knitting; here's to the new year.
Thursday, December 29, 2011
Monday, December 19, 2011
Festivus: The Joy Of Wrapping
So we are now in the thick of the Festivus; and now that I have all these gifts (homemade & not), I have to figure how to wrap them in a way that helps the earth & my wallet. But there are so many possibilities.
First off, I always save the gift bags & cloth ribbon from the year before. In fact, I still have some ribbon from our wedding. And to make reusing gift bags easier this year, I'm printing & attaching gift tags. That way, there are no stickers you have to worry about removing.
Reusing gift bags & ribbon is one easy way to save on expensive, wasteful wrapping paper. According to Trash Trivia, an additional 5 million tons of waste is generated during the holidays in the U.S. "4 million tons of this is wrapping paper and shopping bags." I try to use cloth shopping bags, and if I do take plastic bags, we store them for later use. And I think some stores like Kroger even take in old bags to be recycled.
As for ribbon, the Clean Air Council reports, 38,000 miles of ribbon is tossed every year. But if you use cloth ribbon, or even the kind with wires, you can reuse it in multiple ways. It's just something to think about.
While I am attempting to make cloth bags & maybe even newspaper gift bags, I plan on making this week's blog easier by sharing some inspiring links. I hope you all don't mind.
There are so many links that provide a pattern for cloth gift bags. Here are some of my favorites:
- DIY Cloth Gift Bags from Wilmington Parent Magazine
- Two Gift Bags At Once from Green Upgrader
- Fabric Gift Bags from Eartheasy
And if you're looking for a simpler, yet artsy way to wrap with cloth, try Furoshiki: Japanese cloth gift wrapping. No sewing required.
Another cool way to wrap gifts is making newspaper gift bags. I found this on pinterst and loved it. I haven't been able to make it yet, but I really want to try it.
So there are a few ways you can be green & creative when wrapping gifts. I really hope you give at least one of them a try. While I am being lazy in this week's post, don't worry, I have big plans for the entry coming up soon. It will most likely be on Tuesday or Wednesday, but believe me friends, it will be worth the wait. I hope that those of you who celebrate Christmas have a merry one this year.
Monday, December 12, 2011
Festivus: Homemade Gifts In Bulk
While some may say that I'm a Grinch, I love giving gifts during the Holidays. While receiving a few gifts is nice (of course), I normally go out of my means to ensure everyone I know and love gets some kind of gift. And that can get expensive. So this year, I swore I would not spend the money I normally do and instead make a bunch of homemade gifts.
I also realize that by reading this, many of my friends & family will now see what they will be getting this year. So if you expect a gift, try not to read. The element of surprise is the price I pay to inform the public of what they can do. You're welcome, world.
Now that I gave that warning, let's get started. I tried to keep things simple and came up with two ideas: dry dog treat jars (for my friends and their wonderful canines) & white chocolate peppermint bark for everyone else outside of immediate family. With ingredients for those two ideas, I can cover a lot of people at a cheap price.
So first, the peppermint bark. Did you know that it is super easy to make? By using this simple recipe by Paula Dean, I made a delicious chocolate peppermint bark while saving the bank on ingredients. In fact, I already had them in my home.
Another perk is that making the bark is a good excuse to use a hammer. I lightly hammered away at a bag full on mini candy canes for the peppermint part.
Making the bark took no more than 10-15 minutes, then I left it in the fridge for a few hours while seeing friends. It turned out great, and since it made about 2 pounds of candy, I should have a lot of friends & family covered.
So I have been planning for months on making the dry dog treat jars for loved ones that allow dogs to run their life. I used the dog biscuit recipe book I bought to find a recipe where the ingredients were (at least mostly) dry so the recipient could easily make the treats. I actually only found two that met that qualification. So I gathered the ingredients in bulk at the local organic store (I'm sure they enjoyed the extra business!) and went to town. In order to fit the ingredients into the jars, I had to tweek the recipe a little bit. Hopefully it'll turn out ok, and just leave the recipient with a smaller batch.
 I also added a few little things to make it special, like a cloth topper with a paw stamp, some yarn, and a tag listing the instructions. By the way, did you know there are loads of websites and blogs that offer free tag templates that you can print off at home? I ended up using this site for ours.
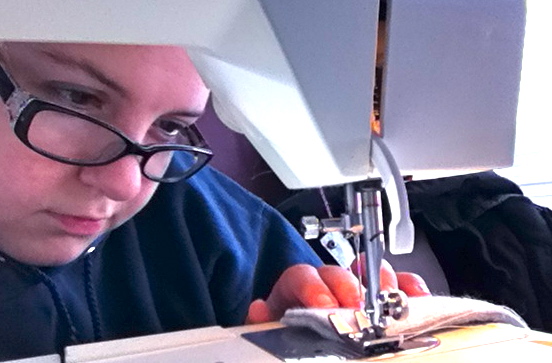
 So over the next month as I ship out and give away these gifts, I'm trying one last bulk gift as a stocking stuffer for immediate family: re-useable hand warmers! I saw this great idea first on pinterest (officially addicted), and had to try it! But instead of sewing hearts, I made boring rectangles so I could make as many as possible with the fabric I had. Plus sewing a small pillow case is quick & easy to do. Most of you should know by now that I'm all about that.
 I actually haven't used a sewing machine in ages, so while I needed a little bit of practice, I could see each hand warmer pattern improve over time. It was also a good learning opportunity for the husband, who wasn't lucky enough to be offered Home Ec. in school. I guess my small farm town school wanted to prepare girls to be stay-at-home moms, not that there is anything wrong with that. But then again, we also took industrial arts (aka shop) in middle school too. Though from what I've heard, both classes were recently cut due to the district's budget (of course).
But these hand warmers are great. The fleece is fuzzy; and with rice, they are reusable. Just pop them in the microwave for a bit (for ours, 50 seconds) and it's hot & ready. You just need to be able to get past the steamy rice smell. Since they are so easy & cheap they are to make, I'm in the process of making a lot.
 So there you have it, three gift ideas that are cheap, easy, and quick. If you decide to try out these gifts, you will get more than just the accomplished "yeah, I made that," feeling. You will also feel the warmth and joy of being able to give to all of your loved ones. There is nothing better than seeing the smile and receiving the hug from a relative that loves the trinket you just gave. Or the soft "thank you" for the small toy you gave your friend's child. I love that feeling. It makes up for all the cruel, cold, and twisted events that I have to read about and report at work.
Now that you've made that perfect gift, let's get to wrapping it. Next week, I will attempt an entry about green gift wrapping. I hope I will be wrapping gifts by then.
I also realize that by reading this, many of my friends & family will now see what they will be getting this year. So if you expect a gift, try not to read. The element of surprise is the price I pay to inform the public of what they can do. You're welcome, world.
Now that I gave that warning, let's get started. I tried to keep things simple and came up with two ideas: dry dog treat jars (for my friends and their wonderful canines) & white chocolate peppermint bark for everyone else outside of immediate family. With ingredients for those two ideas, I can cover a lot of people at a cheap price.
So first, the peppermint bark. Did you know that it is super easy to make? By using this simple recipe by Paula Dean, I made a delicious chocolate peppermint bark while saving the bank on ingredients. In fact, I already had them in my home.
Another perk is that making the bark is a good excuse to use a hammer. I lightly hammered away at a bag full on mini candy canes for the peppermint part.
 |
| Nice. |
 |
| I was able to get the plastic baggies from Hobby Lobby. |


 I actually haven't used a sewing machine in ages, so while I needed a little bit of practice, I could see each hand warmer pattern improve over time. It was also a good learning opportunity for the husband, who wasn't lucky enough to be offered Home Ec. in school. I guess my small farm town school wanted to prepare girls to be stay-at-home moms, not that there is anything wrong with that. But then again, we also took industrial arts (aka shop) in middle school too. Though from what I've heard, both classes were recently cut due to the district's budget (of course).
But these hand warmers are great. The fleece is fuzzy; and with rice, they are reusable. Just pop them in the microwave for a bit (for ours, 50 seconds) and it's hot & ready. You just need to be able to get past the steamy rice smell. Since they are so easy & cheap they are to make, I'm in the process of making a lot.

Now that you've made that perfect gift, let's get to wrapping it. Next week, I will attempt an entry about green gift wrapping. I hope I will be wrapping gifts by then.
Monday, December 5, 2011
Festivus: Quick Dive Into Decor
There is no appropriate adjective to describe how much I love festivus. An that includes all the fun ways to decorate the home. And if you have the time, why not make some of your decor? While I (and my sleep schedule) have been shifted around a lot this week, I was able to get a few things done.
First off, as I mentioned last week, I've been waiting to put together a cute, little advent calender that is similar to the one I found on Mod Podge Rocks. I did a few things different though.
First off, since I knew this post would not be up until a few days into December, I decided to cut down some of the days. And I'm sure I saved a few dollars going with only 12 boxes & a smaller canvas. With a 24" by 36" canvas, I still had plenty of room.
I also went outside the box. The local Hobby Lobby had a great sale on all sorts of little cardboard boxes. So I simply picked out 12, including two larger ones for the first and last day.
I'm sure I also did this with a lot less science and math than I should. Taking a photo of where I wanted things to go was the only pre-meditated preparation I really did. Speaking of preparation, here's what you need:
- 24" by 36'' canvas (Maybe smaller? You pick)
- Acrylic paint: Hunter green, holly red, sap green & white
- Paint brushes (duh.)
- Mod Podge (It's pretty awesome)
- Hot glue gun
- Hot glue (duh. again.)
- 12 boxes (get creative)
- Christmas card stock (I found a sweet set that included stickers)
 So after you get all of the supplies, lets get down to the process. First, I placed (later found out 11, not 12) the boxes on the canvas and marked where the boxes would go. Before you really get started, count and make sure you have all 12. Otherwise, you'll have to try to place a random box out of order.
Next: Painting. Lots and lots of painting. You'll need to paint the canvas one color. I left a bit of white in the spots I wanted the boxes to go as a reminder. While you are at it, paint the sides of the boxes & lids.
After everything is dry, take out the card stock. Use the lids to trace on the card stock to cut out decorative tops to the lids. Then cut out the paper. Then I used a paint brush to apply Mod Podge to the lid tops, then stuck on the card stock. That will need to dry.
When everything is dried out, I painted circles on the lids as background for the numbers. For the two large boxes, I used a "circle box lid" to trace a circle. For the smaller boxes, I think I used a tea candle.

Once that dried, I sketched the painted numbers into the circles, and traced a ring of paint around the circles.
Now that all the boxes are ready, get the glue gun out. And believe me, you will be using lots of glue. I had some difficulty quickly going from gluing the bottom of the boxes then applying to the canvas, so I had to do it a few times. Don't get discouraged.
I applied some of the stickers to the canvas, but I still felt some of the canvas was bare, so I started some free-hand painting.
When everything is dry, then its good enough to hang and stuff with little gifts.


While the advent calender was my main objective, I wanted to show off a few other things I accomplished. Since I spent so much time painting, I also purchased a wooden "B" and painted it with festive Christmas colors to put on display.
 And after seeing it on pinterest, I tried a cute little window decor idea. With one of our old curtain rods, ribbon & large ornaments, we placed a rack of hanging ornaments in our main living room window.
And this design was really easy do. Just needed a little pre-planning, few measurements for the ribbon, and presto! You would be amazed at all the easy things you can do to get your home in the holiday spirit.
First off, as I mentioned last week, I've been waiting to put together a cute, little advent calender that is similar to the one I found on Mod Podge Rocks. I did a few things different though.
First off, since I knew this post would not be up until a few days into December, I decided to cut down some of the days. And I'm sure I saved a few dollars going with only 12 boxes & a smaller canvas. With a 24" by 36" canvas, I still had plenty of room.
I also went outside the box. The local Hobby Lobby had a great sale on all sorts of little cardboard boxes. So I simply picked out 12, including two larger ones for the first and last day.
I'm sure I also did this with a lot less science and math than I should. Taking a photo of where I wanted things to go was the only pre-meditated preparation I really did. Speaking of preparation, here's what you need:
- 24" by 36'' canvas (Maybe smaller? You pick)
- Acrylic paint: Hunter green, holly red, sap green & white
- Paint brushes (duh.)
- Mod Podge (It's pretty awesome)
- Hot glue gun
- Hot glue (duh. again.)
- 12 boxes (get creative)
- Christmas card stock (I found a sweet set that included stickers)
 So after you get all of the supplies, lets get down to the process. First, I placed (later found out 11, not 12) the boxes on the canvas and marked where the boxes would go. Before you really get started, count and make sure you have all 12. Otherwise, you'll have to try to place a random box out of order.
Next: Painting. Lots and lots of painting. You'll need to paint the canvas one color. I left a bit of white in the spots I wanted the boxes to go as a reminder. While you are at it, paint the sides of the boxes & lids.
 |
| Old paper bag = great paint drop cloth |
 |
| I now know the joy that is Mod Podge |

Once that dried, I sketched the painted numbers into the circles, and traced a ring of paint around the circles.
 |
| Sorry, had to get artsty there for a moment. |
I applied some of the stickers to the canvas, but I still felt some of the canvas was bare, so I started some free-hand painting.
 |
| Our cat helping me paint. He totally took over my knee cushion. |


While the advent calender was my main objective, I wanted to show off a few other things I accomplished. Since I spent so much time painting, I also purchased a wooden "B" and painted it with festive Christmas colors to put on display.
 |
| Utilizing the window space |
Subscribe to:
Comments (Atom)